Moving Home with Appliances: A Checklist for Smooth Moves and Setup
Moving to a new home is exciting, but moving appliances safely can be one of the most challenging parts of a house move. Large appliances like fridges, washing machines, and cookers are heavy, awkward, and easy to damage if not handled properly. Whether you’re a homeowner taking your trusty fridge-freezer with you, or a landlord preparing appliances for a new tenant, a bit of planning and care goes a long way. This friendly guide provides an appliance checklist when moving house – covering how to disconnect, transport, and re-install your appliances – so you can settle in with everything running smoothly.
Before the Move: Plan and Prepare
A successful appliance move starts well before moving day. Begin by planning and gathering the supplies you’ll need:
-
Measure Doorways and Pathways: Make sure each appliance can fit through your doors, hallways, and stairs. If your fridge or cooker is too wide, you might need to remove doors or handrails temporarily.
-
Get the Right Tools: Have an appliance dolly (a sturdy trolley) for moving heavy items, plus straps or rope to secure them. Moving blankets or old quilts are great for wrapping appliances to prevent scratches. Also grab basic tools (screwdrivers, wrenches, pliers) for disconnecting water hoses or securing transit bolts.
-
Enlist Help: Don’t try to shift a washing machine or american-style fridge solo. Plan for at least one or two strong friends or professionals to assist – your back will thank you.
-
Schedule Professionals for Gas or Plumbing: If you have gas appliances (like a gas cooker or dryer), arrange for a Gas Safe registered engineer to disconnect and later reconnect them. Likewise, consider a plumber for appliances with water connections, such as fridges with ice makers, to safely disconnect water lines.
-
Clean and Empty Appliances: A few days before the move, use up or donate the food in your fridge and freezer. Empty and clean appliances so they’re lighter and won’t spill anything unpleasant during transit. This also means defrosting freezers in advance (more on that below).
Taking these preparatory steps ensures you won’t be scrambling on moving day, and it greatly reduces the risk of damage or accidents. Now, let’s go through each major appliance one by one in our checklist.
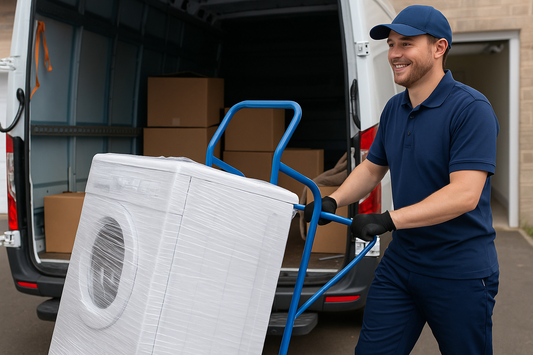
Washing Machine: Disconnect, Drain, and Secure
Washing machines require special attention because they hold water and have moving parts that need stabilising. Follow these steps to safely disconnect and move your washer:
-
Turn Off and Unplug: Switch off the washing machine and unplug it from the mains. Shut off the water supply valves (usually located behind the machine for hot and cold).
-
Drain the Water: This is crucial – washing machines can hide several litres of water inside. In fact, a washer could still have 5 to 10 gallons (20–45 litres) of water inside it after a cycle. To drain it, carefully disconnect the inlet hoses from the water taps and let any water in them drain into a bucket. Next, locate the drain hose (the wider hose) and have a bucket ready. Drain any remaining water from the machine’s drain hose. Some machines also have a small drain filter or plug at the front bottom – open that to release water into a tray or towel. Be patient and mop up any spills; you don’t want that water leaking out in the moving van.
-
Remove and Pack Hoses: Once drained, disconnect the hoses completely. Keep the inlet hoses and drain hose together – you can place them in a plastic bag and tape it to the machine or clearly label them so they don’t get lost.
-
Secure the Drum: Washing machine drums are suspended on shocks or springs and can be damaged by shaking during transport. Most machines come with transit bolts (shipping bolts) that lock the drum in place – if you kept yours, now is the time to use them. Insert the transit bolts into the back of the washer to immobilise the drum. If you don’t have the bolts, try to stabilise the drum by stuffing towels inside the drum (after draining) or refer to your manufacturer’s instructions for moving without bolts. Securing the drum is vital to prevent internal damage.
-
Tape Cords and Doors: Close the washing machine door and tape it shut so it can’t fly open. Also tape the electrical cord to the back of the washer. This avoids tripping on cords or the door swinging while carrying the machine.
-
Use a Dolly and Help to Move: A washing machine is both heavy and unwieldy – usually 68–90 kg in weight. With a helper (or two), tilt the washer just enough to slide the appliance dolly underneath. Secure it with straps. When wheeling it out, keep it upright; avoid laying a washer on its side if possible, as it can upset the drum balance and possibly leak remaining water. Take care on steps (go one step at a time with spotters holding it steady). Protect your floors with cardboard or an old rug when rolling the machine out to avoid scratches.
By following this checklist, you’ll have your washing machine safely ready for the move. It’s a bit of effort, but it beats dealing with a flooded van or a broken drum later on!
Fridge/Freezer: Defrost, Drain, and Secure for Transport
Refrigerators and freezers need extra preparation because they must be defrosted and secured to prevent both water leaks and damage to the cooling system. Here’s how to get your fridge/freezer ready:
-
Empty the Fridge: A couple of days before moving, start using up your perishables. On moving day, the fridge and freezer should be empty. Transporting a fridge with food inside is a recipe for mess (and spoiled food).
-
Unplug and Defrost: Unplug your refrigerator/freezer at least 24 hours before moving day. This gives it time to fully defrost. Prop the doors open to let warm air in – this speeds up melting. Place towels or old newspapers at the base to soak up water from the thawing ice. Resist the urge to chip at the ice with a knife, as you could damage the interior; let it melt naturally.
-
Clean and Dry: Once all the ice has melted, wipe out the inside thoroughly. Now is a great time to clean the interior with a mild cleaner and ensure it’s completely dry. Don’t forget to empty and dry the evaporator pan (the drip tray usually behind the grille or on the back). A clean, dry fridge won’t grow mould or smell funky when you power it back on.
-
Remove Shelves and Bins: Take out any loose shelves, drawers, and bins. Glass shelves especially should be removed and packed separately (wrap them in towels or bubble wrap). Travelling separately prevents them from rattling around and breaking inside the fridge during the move. Put screws or small parts (like shelf clips) in a labelled bag.
-
Disconnect Water Lines: If your fridge has a built-in ice maker or water dispenser, turn off the water supply and disconnect the water line (usually a thin tube at the back). You may want a plumber to do this if you’re unsure. Cap off the loose hose end to prevent leaks. It’s often recommended to have a professional reconnect the ice maker at the new home to avoid any leaks or installation issues.
-
Secure Doors and Cord: Tape the power cord to the back of the fridge so it’s not dangling. Either tape the fridge and freezer doors shut, or use straps/rope to tie them securely closed. The doors should not open during transit – a swinging door could damage hinges or other items nearby.
-
Keep Upright and Move Carefully: Always move a fridge or freezer in an upright position if possible. Compressors don’t like being tipped – the oil inside can flow out and lead to damage. Use a dolly to support the fridge from the back, keep it vertical, and go slowly. If an upright move isn’t possible (e.g., you have to lay it down to get through a low doorway), try to lay it on its side opposite the side of the compressor (usually lay it on the side where the compressor lines are coming out, so that oil stays in the compressor). Once at the new place, don’t plug it in right away if it was tilted; let it stand upright for a few hours (or even as long as it was on its side, up to 24 hours) to allow fluids to settle back.
-
In the Van: Strap the fridge in place inside the moving van so it can’t slide around. Keep it upright and wedged between other items or use bungee cords to secure it to the wall of the van.
Fridges and freezers are among the costliest appliances, so taking time to do all this preparation is well worth it. You’ll avoid a scenario where you arrive at your new home with a puddle of water or a fridge that won’t cool because it was mishandled.
Cooker / Oven: Disconnect and Protect Your Cooker
Cookers (ovens and stoves) need careful handling, especially gas models. They’re heavy and often have irregular shapes (with doors and knobs that can snag). Here’s how to prepare your cooker for a move:
-
Turn Off Power/Gas: If it’s an electric cooker, switch off the power supply (unplug it if it’s a plug-in model, or turn off the cooker’s isolator switch). Many electric cookers in the UK are hard-wired to a cooker switch – in that case, you might need an electrician to safely disconnect it. For gas cookers, call a Gas Safe engineer to shut off the gas supply at the valve and disconnect the gas line. Never improvise with gas; it’s worth the small fee for safety.
-
Remove Loose Parts: Open the oven and take out any racks, grill pans, or trays. Also remove burner rings or grates on a hob if they’re not fixed. Pack these separately in a box with padding so they don’t rattle around and scratch the oven interior. If your cooker has a glass lid or a delicate glass hob, consider a layer of bubble wrap or cardboard over it for protection.
-
Clean Grease and Grime: This isn’t mandatory, but giving the cooker a quick clean can prevent grease from smearing on other items during the move. Plus, it’ll make it nicer to install at the new place.
-
Secure the Door: Tape the oven door shut. For some ovens, you might even be able to remove the door entirely (certain models allow the door to unhook for cleaning) – removing it can make the unit lighter and easier to handle, and you can move the door separately. If you leave it on, don’t lift or pull the cooker by the door handle, as it’s not designed to support the appliance’s weight.
-
Wrap and Protect: Cocoon the cooker in moving blankets or thick padding, especially around corners and glass panels. This will prevent dents or scratches to the finish (and protect walls and other furniture from knocks by the cooker). Use tape or stretch wrap to keep the padding in place, but avoid tape directly on painted surfaces of the appliance.
-
Use a Dolly for Heavy Ranges: Slide a piece of cardboard or plywood under the cooker’s feet to protect the floor when you start to move it. With help, angle the appliance slightly and get a dolly underneath. Many cookers have the weight concentrated in the bottom (heavy ovens, cast iron parts, etc.), so they can be bottom-heavy – tilt with care and keep it balanced on the dolly. Strap it in place.
-
Mind the Fuel Lines: If the cooker was gas, ensure the disconnected gas line (at the wall) is safely capped off. You might have had a professional remove the flexible hose connector from the pipe – if not, have the gas supply capped for safety until a pro reinstalls the cooker at the new home.
By wrapping and handling your cooker carefully, you’ll prevent damage to the appliance and your home. No one wants a gouge in the kitchen floor from dragging an oven, or a broken oven door window because it swung open unexpectedly. Take it slow and steady.
Dishwasher: Drain and Pack Up Properly
If you’re moving a dishwasher, many of the steps are similar to a washing machine, since dishwashers are plumbed in and also hold water. Here’s the checklist for dishwashers:
-
Finish a Cycle and Unplug: Ideally, run a final empty wash with a cup of white vinegar or a dishwasher cleaner a few days before moving – this will clean the interior and prevent any smells. Once done, unplug the dishwasher (the socket is often under the sink or behind the machine) and turn off the water supply valve (usually under the sink as well).
-
Disconnect Water and Drain Lines: Place towels under the water supply hose connection and where the drain hose connects (typically under the sink trap or garbage disposal). Carefully disconnect the water inlet hose from the water valve and the drain hose from the sink drain or disposal. Have a bucket handy and drain any water from these hoses. Be ready for some drips – gravity means water will linger in the hoses. Once removed, wipe the hoses dry and pack them in a plastic bag.
-
Drain Internal Water: Some water may remain in the bottom of the dishwasher. You can scoop it out or use a sponge to absorb it. Also, leave the dishwasher door open for a while to fully dry out the inside. A dry interior prevents mould during the move.
-
Remove Racks and Utensil Baskets: Just like with the fridge, take out the dishwasher’s racks and cutlery basket. These can be packed separately or secured so they won’t slide around. If you leave them inside, at least tape them down or wedge them securely.
-
Secure the Door and Cord: Close the dishwasher door and tape it shut so it won’t swing open. Also tape or tie the power cord to the back of the machine.
-
Detach from Cabinet (if built-in): Most built-in dishwashers are fixed to the underside of the countertop with a couple of screws (open the door and look up at the frame for screws securing it). Remove these screws so the dishwasher can slide out. You may also need to adjust the leveling feet down to lower the dishwasher if it’s snug under the counter. Once free, carefully slide out the dishwasher – watch out, the front can be heavy if there’s a weighted base.
-
Wrap for Protection: Dishwashers usually have a finished front door but unfinished sides. Wrap a blanket around it to protect the front and any nearby furniture during the move. They’re not as heavy as fridges or washers, but you should still use a dolly or at least a two-person lift to carry a dishwasher.
At the new home, you’ll need to reconnect the water and drain and ensure no leaks – if you’re not comfortable with plumbing, have a professional handle the installation. Getting the connections right (especially the drain hose position) is important to avoid water flooding back into the dishwasher. Once installed, run a rinse cycle to test for leaks before putting the kick plate back on.
Other Appliances (Dryers, Microwaves, etc.)
Don’t forget other appliances you might be moving:
-
Tumble Dryer: For an electric dryer, unplug it and disconnect the vent hose from the wall. Clean out any lint from the hose and drum (good maintenance!). If it’s a condenser dryer, empty the water tank. Tape the door closed and the power cord to the back. For gas dryers, treat it like a gas cooker – have a professional disconnect and reconnect the gas line. Always cap gas lines when not in use. Transport dryers upright if possible and secure the drum (most dryer drums are supported by the frame, no transit bolts needed).
-
Small Appliances: Microwaves, countertop ovens, mixers, etc., should ideally go back in their original boxes with padding, or use a sturdy box with bubble wrap. Remove any trays (like the glass turntable in a microwave) and pack those separately to avoid breakage. Label these boxes as “fragile”. It’s easy to overlook small appliances in your checklist, but packing them properly ensures they arrive intact.
-
Televisions and Electronics: Not exactly “appliances,” but often moved at the same time. Use appropriate boxes or blankets – and remember to remove any CDs, batteries, or loose items from them before moving (e.g., remove batteries from your electronic kitchen scale or wall clock to prevent corrosion if they’ll be stored).
-
Kettles and Toasters: These can just be emptied (no water in the kettle), cleaned of crumbs (toaster), and packed in a box. Wrap the cords around them neatly. They’re hardy, but no one likes a dinged-up kettle.
Essentially, any appliance you move should be clean, dry, and secured to avoid mishaps.
Moving Day: Safe Handling and Transport
With all the preparation done, moving day is all about handling those appliances with care:
-
Lift with Care: Always lift from the knees, not your back. Use teamwork for heavy items – communicate each step (“Ready? Lift on three...”). Appliances are bulky, so keep the path clear of tripping hazards.
-
Use Dollies and Straps: As mentioned, employ the appliance dolly for fridges, washers, ovens – it bears the weight so you don’t have to. Strap appliances to the dolly if possible, so they don’t tilt off. For sliding across short distances (like across a kitchen floor), furniture sliders or even an old blanket under the appliance can help it glide without scratching the floor.
-
Keep Upright: We’ve said it but it’s worth repeating: keep appliances upright during transport whenever feasible, especially anything with refrigerant (fridges, freezers, air conditioners) or water. If something must be tilted, do it for as short a time as possible and let it settle upright later.
-
Protect the Truck and Other Items: Load appliances toward the front of the moving truck (near the cab) and on the floor, not stacked on anything unstable. Use ropes or ratchet straps to tie them to the side rails in the truck. Wrap each appliance in a moving blanket so if it does slide a bit, it won’t scratch adjacent items. Also, a pro tip: avoid placing heavy appliances on top of soft furniture (and vice versa) – a fridge can squish your sofa, and a sharp metal corner under a washer could tear upholstery.
-
Driving and Unloading: If you’re driving the van yourself, take it slow and steady – avoid harsh braking or sharp turns that could send appliances tipping. When unloading, use the same care as loading. It might be tempting to rush once you’re at the new place, but maintain good lifting practices and clear the path inside the new home before bringing appliances in.
Setting Up and Testing Appliances in Your New Home
Congratulations, you’ve gotten your appliances to the new property! Now it’s time to install and test them, making sure everything is working correctly from day one. This part is a bit like doing pre-tenancy checks for a rental, something we always recommend to ensure appliances are safe and functional. Here’s what to do as you set each appliance back up:
-
Washing Machine: First, remove the transit bolts or drum braces you installed for the move – never run the washer with those still in, as it can damage the machine. Position the machine in its new spot, being careful not to pinch the power cord or hoses behind it. Connect the water inlet hoses to the hot/cold taps and to the machine, making sure the rubber washers are in place to prevent leaks. Connect the drain hose to the standpipe or sink drain – use the u-bend clip if there is one to secure it at the proper height (to prevent siphoning). Turn on the water supply valves and check for any leaks at the connections. Then plug in the machine. It’s wise to run a test cycle (perhaps a rinse or quick wash with no clothes) to ensure the washer fills, drains, and spins normally with no leaks. Also check that the machine is level on the floor (adjust the feet if necessary) to avoid excessive vibration.
-
Fridge/Freezer: Move the fridge into place carefully, minding the flooring. If your fridge was transported upright, you likely only need to wait a couple of hours before plugging it in. If it was on its side at any point, give it a good few hours upright (some experts say as many hours as it was laid down, up to 24 hours) before turning it on. Once ready, plug it in and set the thermostat. It may take several hours to cool to the set temperature, so don’t panic if it isn’t cold in the first 30 minutes. If you have an ice maker or water dispenser, now is the time to have that water line connected (again, possibly by a plumber to be safe). After the fridge has cooled, you can reload it with food. Tip: discard the first batches of ice or water from a reconnected dispenser, as the lines may have sediment from the move.
-
Cooker/Oven: For electric cookers, have an electrician hard-wire it if required (many UK electric cookers need a dedicated cooker circuit). For gas cookers, your Gas Safe engineer will need to attach it to the gas supply, test for leaks, and relight any pilot if applicable. Once installed, test the oven and hob to ensure they heat up properly. If it’s a dual-fuel range (gas hob, electric oven), you might need both professionals involved. Make sure the cooker is level so that oil in a frying pan doesn’t all pool to one side. Usually, cookers have adjustable feet for leveling. Also, refit any parts you removed (oven racks, hob burners) and make sure all knobs and buttons are present and secure.
-
Dishwasher: Position the dishwasher into its cabinet space carefully, feeding the drain and supply hoses through the side of the cabinet to under the sink. Reconnect the water inlet hose to the supply (don’t forget to put the washer in the coupling) and reconnect the drain hose to the sink drain or disposal inlet. Before sliding the dishwasher fully in, turn on the water valve and check for leaks at the connection. Then plug in the power (or turn on the spur). Slide the dishwasher back under the counter and make it level (adjust the feet). Finally, run a quick wash cycle with no dishes to ensure it fills with water, drains properly, and that there are no leaks underneath or at the drain connection.
-
Tumble Dryer: If electric, just plug it in and connect the vent hose to the wall vent (for vented models). Ensure the hose isn’t kinked. If condenser, no hose needed, just make sure the water tank is in place. For gas dryers, have the gas line reconnected professionally and test the ignition. Run the dryer briefly to check the drum turns and there’s airflow out the vent (for vented types).
-
Other Appliances: Reassemble any loose parts (shelves in the fridge, microwave turntable, etc.) that you packed separately. It’s a good idea to wipe down appliances after the move, as they might have gathered some dust or grime. Check that things like cooker hood/extractor fans, if moved, are securely installed and functioning.
Once everything is plugged in and seemingly running, keep an eye (and ear) on your appliances the first time you use each. Listen for odd sounds, check for water under appliances after their first use in the new place, and verify temperatures (is the fridge cold, oven heating, etc.). If something isn’t working right – perhaps the washing machine isn’t draining or the oven’s not heating – it could be due to an installation issue or something jostled in the move. In that case, don’t hesitate to call in a professional appliance technician to diagnose and fix it. It’s better to address it early than to let a small issue turn into a bigger problem.
For Landlords and Letting Agents: Extra Tips
If you’re a landlord or agent dealing with appliance changeovers between tenants, all the above advice applies to you too. Often during tenant turnover, you might need to remove or replace appliances, or at least check that existing ones are in good nick. Here are a few additional pointers for rental situations:
-
Pre-Tenancy Checks: As part of your inventory and check-in, test and document each appliance’s condition before the new tenant moves in. This means checking that the fridge is cold, the oven heats up, the washing machine runs through a cycle without issue, etc. It’s the same idea as a homeowner testing appliances after a move – ensure everything is safe and functional from day one. A simple spreadsheet or checklist can help, and keep records of any repairs done.
-
Cleaning and Maintenance: It’s good practice (and just courteous) to provide clean appliances to incoming tenants. Defrost and clean the fridge/freezer, run a drum clean on the washer, and so on. This not only makes a good impression but also lets you spot any developing issues. For example, you might notice an oven element not heating fully or a dishwasher spray arm cracked – you can fix or replace these before the tenant encounters them.
-
Moving Appliances in/out of Rentals: If an outgoing tenant is taking their own appliance (say they brought their fridge), ensure they do it safely to avoid property damage – you don’t want scratched floors or water leaks left behind. It could be wise to supervise or have a handyman assist if you’re concerned. Likewise, if you’re bringing in a new appliance (replacement or adding one), follow the safe moving guidelines above to protect the property.
-
Safety First: Remember legal obligations – any gas appliance must be reconnected by a Gas Safe engineer and typically you’ll have a Gas Safety Certificate for it. Electrical appliances should be checked for any frayed cables or unsafe conditions. Portable Appliance Testing (PAT) isn’t mandatory for landlords in all cases, but it’s a good safety check for provided appliances.
-
Local Support: If your rental property is in our area (Merseyside or Chester), keep in mind that Grange Electrical offers prompt appliance repair and installation services. Establishing a relationship with a local appliance expert means you can quickly sort out any issues during that critical changeover period, keeping your tenants happy and your property protected.
By treating the move or turnover of appliances with care, landlords demonstrate professionalism and care for their property. Happy tenants are more likely to stick around (and treat the appliances well in return), and you’ll have fewer emergency calls about fridges breaking down or washers flooding the flat.
Conclusion: Smooth Moves and Peace of Mind
Moving home with appliances can be a daunting task, but with this checklist and a bit of elbow grease, you can do it safely and efficiently. The key takeaways are: plan ahead, secure everything, and don’t rush. By disconnecting and packing appliances properly, you’ll prevent damage both to the machines and to your home (no one wants gouges in walls or water on the floor!). And by setting them up carefully in your new place, you ensure your household gets up and running without a hitch.
Remember, a little extra time spent coiling cords, taping doors, or waiting for a freezer to defrost can save you a lot of trouble down the line. You’ll preserve the lifespan of your appliances and avoid costly repairs by doing things the right way. As a bonus, you’ll arrive in your new home knowing that your appliances are clean, safe, and ready to go – which means one less thing to worry about in the chaos of moving.
If you do hit a snag – perhaps an appliance isn’t working after the move, or you need help reinstalling a washing machine – you’re not alone. Grange Electrical is here to help homeowners and landlords in the Merseyside and Chester area with appliance installations, safety checks, and repairs. We’ve been helping local families and property owners for decades, so we understand the common pitfalls of moving appliances. By sharing these tips, we hope to make your move a bit easier and show that we care about your appliances as much as you do (it’s all about that brand trust!).
Good luck with your move, handle those appliances with care, and enjoy setting into your new home with everything running smoothly. With a solid checklist and the right support, you can conquer even the trickiest of appliance moves – and look forward to a nice cuppa from your kettle in your new kitchen, knowing all your appliances made the journey safely. Happy moving!